Published 2018/Jan/01
Introduction
Like most other image processing software, Paintshop Pro provides built-in color management (CM). The approach to implementation appears to be an effort at simplification, unlike the way a product such as Adobe Photoshop works, where the user is expected to manage a considerably more complex array of choices in designing CM "policies". If you really understand CM, the Photoshop way is going to be more appealing and flexible although to the newcomer, probably confusing and obtuse. The Paintshop menus for configuring CM are sparse and the documentation could do a better job of explaining exactly what is going on.
This article is an attempt to expose more of how Paintshop CM works and how, for most of the CM things you really need to do, Paintshop is actually up to the job. It can do more in the area of CM than you might suspect.
It's assumed you have a basic understanding of CM. Furthermore, I assume you want to produce the finest possible photographs which means working with RAW/NEF images from the outset, to produce high quality TIFF images for presentation. This is the approach taken throughout.
I use Nikon products so note that in what follows, NEF may be used instead of RAW but it means the same thing.
Note that Paintshop does not have a very good RAW/NEF converter (they call it RAW Lab). I recommend you use something like "Capture One Pro"for RAW conversion to TIFF and initial image adjustments, then finish up with Paintshop using the TIFF version of the image. "Capture One" is able automatically to open Paintshop with the TIFF ready to go and the preferred color profile will already be embedded. Capture One will also have a copy of your camera's profile, enabling it to make a precise conversion to TIFF. I will assume throughout you have used this process or, another RAW converter with similar capabilities ahead of Paintshop.
Color Management (CM) Review
CM is a technology addressing the fact that different types of image displays render colors differently, given the same inputs. CM is a way of moving images between display devices in such a way that changes in appearance are minimized. For example, in a color managed system when we view/edit an image using a computer monitor, then output it on a printer, the printed version will closely resemble what we saw on the monitor. Without CM you are left with trial-and-error as the only means to obtaining consistency in the way your images are displayed by various devices.
It is possible to obtain CM of a sort by using pre-calibrated devices designed to conform to a standard color space. sRGB is such a standard. If you use a pre-calibrated sRGB monitor together with a pre-calibrated sRGB printer then you should be fine. The problem is that the presets may by inaccurate and you will run into trouble the moment you begin working with images not conforming to the preset. On top of it all, monitor output is apt to change significantly over time, meaning the accuracy of presets will deteriorate. If you are fussy about the appearance of your images you will want full control using CM.
Monitor Calibration
For accurate color work your monitor needs to be calibrated. Monitors usually come with one or more selectable presets calibrated in conformity with some standard color space and gamma response but if used in this way there is no means by which images with alternate color spaces can be precisely translated into the color space of the monitor unless software profiles are also supplied. Furthermore, all monitors drift off calibration with the passage of time so, best to choose the monitor's custom settings and do a proper calibration once in awhile. (Calibration and Color Management are described in more detail in the Color Management section of this web site.)
Each point in an image is represented by a trio of numbers such as 050, 135, 242 which comprise a pixel. The numbers stand for the amounts of red, green and blue light (the primary colors) the monitor is then supposed to pump out, with reference to a particular color space. The problem is that the color space represented by the monitor's technology may not be the same as that in which the image was constructed. Calibration builds a mathematically precise description of where the monitor's native color space fits within the internationally standardized Profile Connection Space. That makes it possible for software to translate the original image colors into the monitor space with minimal change in appearance.
There are many standard color spaces such as sRGB, aRGB etc. These are useful in targeting types of displays where color management isn't used but the device has been designed to incorporate one of these standards as a native mode of presentation. A good example is sRGB, widely used on the Internet and what you get with practically all lower priced monitors.
Once the monitor has been calibrated, a color profile describing exactly how the monitor's color response fits within the Profile Connection Space (PCS), including tonal correction curves, is stored in the computer and then automatically or manually loaded into the graphics unit.
Monitors
The vast majority of monitors you find on the shelves are designed to display sRGB color. This is a very old lowest common denominator standard and can be inexpensively implemented. After calibrating such a monitor you will still have only sRGB, albeit probably more accurate than the factory preset. sRGB is the smallest of all standard color spaces, meaning it cannot encompass the range of colors better monitors and printers are capable of. If you are really serious about photography consider an aRGB compatible unit. That stands for "Adobe RGB" and is a wider gamut, capable of displaying significantly better color - especially greens and reds. aRGB units are becoming quite affordable but you may have to special order. Dell carries a number of these and there are occasionally some very attractive sale prices. They come pre-calibrated with aRGB but you will want to run your own calibration to develop a profile your imaging software can access. Like other monitors, these units are apt to drift off standard calibration rather rapidly in the first few weeks (unless you choose an LCD backlit unit) and are pre-set far too bright. Doing your own calibration once in awhile is the solution to drift.
RAW/NEF Conversion
The first step in preparing to edit an image is to convert from RAW/NEF to some standard format. I prefer 16 bits/channel TIFF. This format has been around for a long time and can accommodate any image specification. You can always convert to something else later but TIFF is what you want for your archived originals (be sure to save your unaltered RAWs/NEFs too).
If using Capture One (although the process is similar with other good RAW converters), convert to TIFF format from RAW/NEF, apply adjustments at that stage and for finishing launch into Paintshop from within Capture One. Before exporting the image to Paintshop, make sure 16 bits/channel TIFF has been specified and that the output target profile incorporates the "Prophoto" color space. Prophoto can accommodate any other color gamut so you do not risk losing any colors that will subsequently be unrecoverable.
Why end up launching into Paintshop (PSP)? While Capture One can do a lot, Paintshop has still more controls and supports Photoshop compatible plugins. This gives you an extremely powerful image editing combo.
Enabling CM and Setting Color Working Space in Paintshop
You must ensure:
- The monitor's ICC profile with calibration data is loaded. This should happen automatically at boot but it's not inconceivable you changed it somewhere. You can check the situation on Control Panel/Color Management or with something like DataColor's "Pixel Chooser". Furthermore, Paintshop's CM panel displays the active monitor profile.
- That color management is enabled from within Paintshop.
- That an appropriate Color Working Space (CWS) has been chosen for PSP. You edit the image in the CWS and this is where you give the image the appearance you want it to have.
Open "File" options in the tool bar and highlight "Color Management". This brings me to a pet peeve regarding Paintshop ... you must close all open images before you can change color workspace or color management settings. Fortunately, color management options are not likely to be changed during a typical working session so the annoyance is minor.
So, from "File", choose "Color Management" ...
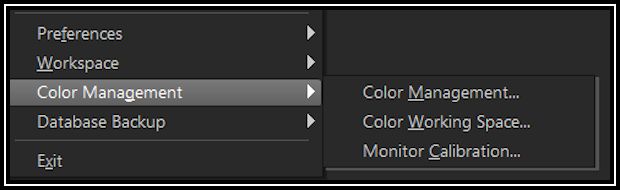
Choose "Color Management" on the right, then ...
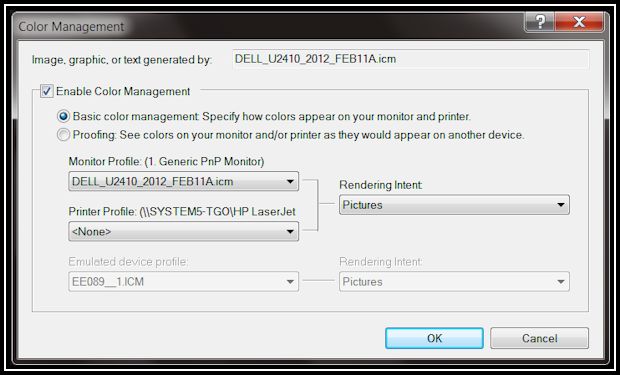
- Check "Enable Color Management" and "Basic". If you plan to print from Paintshop (while turning off color management in the printer drivers - this is important) you should also choose the appropriate paper/printer profile from the "Printer Profile" drop-down. There will be a bunch of those in there supplied when you installed your printer. I prefer "QImage" for printing so that's all I have to say about printing from within Paintshop.
- Choose a "Rendering Intent" for how you want out of gamut colors to be dealt with. Suppose you load an image having a color space larger than that of your monitor or printer - certainly the case if you are using Prophoto as recommended. "Rendering Intent" informs the software how to choose substitutes for such colors within the gamut of the monitor. For general photography, "Pictures" is a good choice. "Pictures" means the same thing as "Perceptual" used in other software. I use QImage for printing instead of Paintshop which is why you see "<None>" for my printer profile. This is not to disparage Paintshop printing which is very good but I find a stand-alone printing package more congenial to my way of working.
- "Monitor Profile" is set automatically and is there for your information.
Once you have set the options in this menu it is likely you will go a long time before wanting to change any of them. They will be remembered between image editing sessions.
Now choose "Color Working Space" (CWS) from the "File/Color Management" menu.
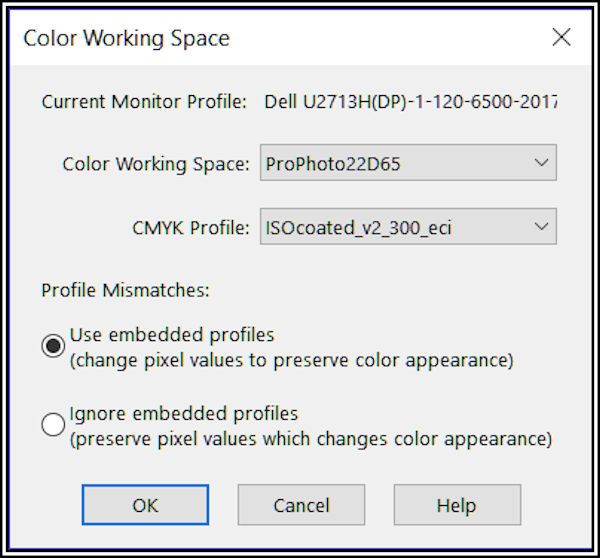
- Again, I strongly recommend you should always choose the Prophoto color space for Paintshop's CWS. Your monitor won't be able to render Prophoto but Color Management will temporarily massage the colors into your monitor's calibrated color space for nominally correct appearance. Prophoto is the largest color space. You can always convert to something else later. Using Prophoto throughout ensures your original TIFF image does not lose any color information due to clipping or other compromise going on in the background.
- Forget about the CMYK profile. This defines the subtractive model for dealing with color whereas we are working with the additive model (RGB) here.
The choice of CWS is a somewhat slippery concept, given that you can always convert later and Rendering Intent compensates somewhat for mismatches if the monitor color space is smaller. Ideally the monitor CS should be large enough to fully embrace the CWS but it will not if you are using recommended Prophoto for the image itself and the CWS. Don't worry about this. Rendering Intent will ensure the best possible fit to your monitor.
From now on the following apply, will happen or will be possibe, as the case may be:
- When you load an existing TIFF, JPEG or any other file that already has an embedded profile, you can choose to have Paintshop ignore the embedded profile in which case it will interpret pixel values according to the CWS profile (appearance will change if image and workspace color spaces do not match) OR you can choose to have it use the embedded profile in which case pixel values will be temporarily changed (until you SAVE when there is the choice to make the changes permanent) so as to translate the image into the workspace with no (or minimal) change in appearance (full color management). Whichever happens is determined by the setting in the second image above ("Color Working Space". There's more on this later and it gets a bit tricky but with the right choices you can pull off just about any color management action you want).
RAW Images and Profiles
In the CM scheme of things, RAW images are often said NOT to have a color space or profile associated with them. To me this doesn't make sense as the RAW image is a product of specific hardware (your camera) so there must be some sort of intention at work regarding just what colors the numbers representing those images mean. Prowl the Internet and you will find mostly a lot of confusion regarding the subject. In fact, there is a camera profile there somewhere and the RAW converter should use this to produce an image you can edit. "Capture One Pro" knows about and uses camera profiles but I doubt Paintshop RAW Lab and some others do. Instead the latter make some sort of generic assumption which will not give the best possible result.
Moving on from this uncomfortable mystery, it remains to convert the RAW image to something you can use, which ought to be TIFF format (if you think you might want a JPEG later this is always easily created from a TIFF).
I strongly recommend you avoid Paintshop's RAW Lab and use something else. I use "Capture One". This may be the best RAW/NEF converter on the planet. Once I have tweaked the image appearance there, I have Capture One launch the output directly into Paintshop from where I finish image preparation. (You can as easily use Adobe Photoshop in this way.)
How to Execute Some Color Management Processes
Much of what follows may never be necessary these days and is mainly applicable to legacy images and processes if you take my advice concerning the Prophoto color space and associated profiles. If your image as produced by your RAW/NEF converter lives in the Prophoto space and if your CWS is Prophoto then you can ignore the choices in the Color Working Space menu described above. That's because no conversions are necessary. Furthermore, it's almost certainly safe to keep Prophoto throughout, even for JPG's you might want to share on the Internet. These days practically all computer systems are color managed and CM will correctly manage your Prophoto images into whatever color space your visitors' monitors are using. If your audience might include very old unmanaged systems or if you have a library of images not using Prophoto, then some of the following may be useful.
Convert From Large Color Space to Small
Objectives: For example, to prepare an sRGB JPEG for the Internet using a high quality aRGB TIFF as the source image.
Select "Edit" view.
- In the Color Work Space menu select the target Color Space profile - In this case we are likely wanting to prepare an image for the Internet and are expecting many viewers may not have a color managed environment in which case sRGB is the best choice. Do not change the monitor profile. Even if the latter has a large color space, color management will cause the image to appear the way it will look in the smaller target CS (the CWS).
- In the Color Work Space menu you will see an "Ignore/Use embedded profile" option - Choose "Use embedded profile". This will cause Paintshop to manage the source image into the CWS while preserving appearance as much as possible with "Rendering Intent". That means pixel bits will be changed permanently.
- Double click the source image's icon in the Organizer or choose it from the Explorer view. The file opens in Paintshop's Editor after advising you the image has been converted into the CWS. Bits have been changed to do this and those changes will be retained when you SAVE.
- The image may already look exactly the way you want it but if not, edit until it does.
- When finished editing, choose SAVE AS ... under File options on the left. In the menu pick JPEG (for Internet posting). The SAVE AS menu has an "Options" box at the bottom ...
- Click the "Options" box to get another menu. I find 20% just about the best compromise most of the time for JPEGs and Paintshop also has a JPEG optimizer to help you. Web preparation is outside the scope of this article but you can find out more in the Printing article.
- Now choose "Embed ICC Profile" and confirm it is the same as the CWS (it will be). This profile will be consistent with the changes made to image bits when the file was opened.
- Save
Summary of Action
- During editing you are working with the image already converted into the CWS. Original appearance has been retained insofar as possible with the help of "Rendering Intent".
- When you SAVE with the CWS profile embedded you have a fully converted image with a profile that will be used to correctly interpret the changes made to the file.
- The image is physically converted to appear as much as possible the way it appeared in the original workspace but it now "lives" in the new, smaller, CS. Pixel values are changed to re-scale colors within the new CS while attempting to preserve appearance. The assigned profile/color space is that of the CWS (the smaller CS).
Convert From Small Color Space to Large
Objectives: It's difficult to think of one as colors have already been compromised by having been defined in the smaller CS. You might, however, wish to continue editing the image in a larger space. It would be better to start over using the RAW file or a copy having a large CS to begin with.
- Proceed exactly as in Convert From Large Color Space to Small.
Summary of Action
Pixel bits are changed so that they look (insofar as possible) in the large CS as they did in the small CS. All colors are now amenable to enhancement within the larger CS. You might, for example, be able to increase color saturation beyond what was possible in the small CS.
Assign a Different Profile to an Image Already having an Embedded Profile.
Objectives: Suppose you have an image file created from RAW while you were working in an sRGB Color Space. You have lost the RAW file but now would rather you had assigned an aRGB profile which allows you greater latitude in editing colors. In this instance, pixel bits are the originals as recovered from the RAW file so you have high quality data to work with. Assigning a profile with a larger CS makes sense.
Select "Editor" view.
- In the Color Work Space menu select the target Color Space profile - This is the new CS you want the image to reside within - aRGB in the case of this example.
- In the Color Work Space menu you will see an "Ignore/Use embedded profile" option - Choose "Ignore" or pixel bits will be changed so that in the new CS colors will appear as they did in the old CS (which is what you want to avoid). Furthermore, those changes will be saved.
- When finished editing (if any), choose SAVE AS ... under File options on the left. In the menu pick TIFF, JPEG or whatever file format you want.
- Click the "Options" box to get another menu. Choose the "Embed ICC Profile" option
- Save.
Summary of Action
The new profile is embedded in the image. No pixel bits are changed. Appearance of the image changes to reflect the new CS.
Edit an Image Whose Color Space is Smaller than Prophoto
Objectives: Assume you have an image saved with an sRGB profile and you now want to do some editing. Your CWS is Prophoto. Just load up that image and edit away. Color Management will ensure it looks the way it's supposed to in sRGB providing you chose "Use Embedded Profiles". When you are done, choose "Save As ..." but do not choose "Embed ICC Profile". The image will retain the sRGB specification.
Conclusion
Paintshop color management supports most of the color manipulation functionality the photographer really needs.
- Assign profiles to images converted from RAW.
- Convert colors from one color space to another.
- Assign a new color space without converting colors.
- Edit an image in a color space other than the one in the embedded profile, then optionally embed the new profile.
An annoyance is that you cannot change the color working space without first closing all open images. In all fairness though, it's very unlikely you would want to change CWS in midst of image editing.