Introduction
As with most other discussions on this site, this page is intended more for the neophyte than experts in the subject. Some ideas concerning how to extend depth of field could prove useful to anyone, however.
By "macro photography" is meant taking photographs wherein the ratio of subject size to image size (as projected by the camera lens) approaches, equals or somewhat exceeds 1:1. At presentation size (in a print, for example), the image may exceed the subject size by an order of magnitude or more. More colloquially, this approach to photography is often called "close-up" photography. There is no precise definition. Just think of this as photography where you examine the world in miniature. Insects and flowers are common themes but there are many others. The objective is usually to reveal what the unaided eye cannot resolve, thereby making accessible the beauty, complexity and design of small objects that would otherwise go unnoticed.
Macro photography is a lot of fun and can add an entirely new and exciting dimension to your photographic interest.
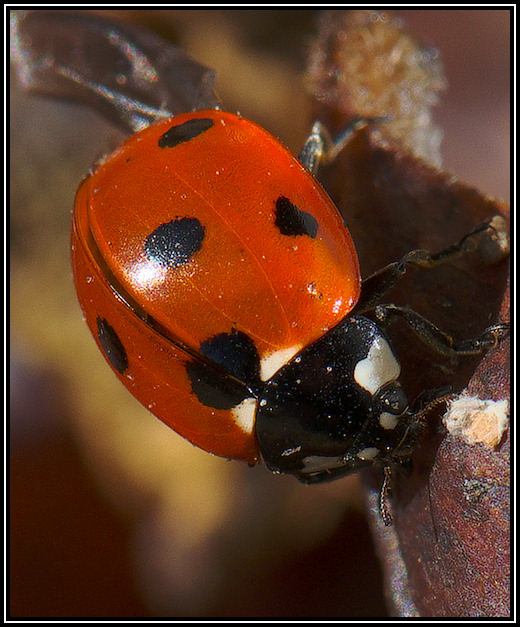
The following is an example of a macro photo taken with a Nikon D300, 105 mm VR and SB-800 flash. Focus was on top of the shell. The insect's head was slightly refocused using Focus Magic as described later in this document:
Equipment
Macro photography requires getting in close enough to the subject that the scale of the image projected by the lens begins to approach that of the subject itself. In fact, the image size will often equal or exceed 50% of the subject size and with true macro capability, 100% can be achieved. Most cameras these days support some sort of macro feature but, as you might expect, the DSLR is the best type for this sort of work. Some compact and super-zoom units will do a remarkably good job but are less than optimum. The primary requirement is that the lens be able to focus at very short range while maintaining reasonable sharpness across the image field.
DSLRs provide the option of fitting a specialized macro lens, such as the Nikon 105 mm VR, which is designed to maintain a sharp, well corrected image at close focusing distances. Standard lenses with close focusing ability may or may not retain high image quality and seldom focus really close enough, requiring greater enlargement when processing for presentation. That usually results in significant loss of image quality.
If you are serious about macro photography you will benefit from the following:
- A DSLR or a super-zoom.
- Ideally, a lens designed for macro work or - a standard type lens with close-focusing ability and a reputation for high image quality at close range. Such standard lenses do exist and the reviews will usually comment on their macro capabilities. "Working distance" can be important. Close-focusing lenses of longer focal length (such as the Nikon 105 mm) allow you to get the necessary magnification at a greater distance than when using short focal length lenses. This reduces the likelihood of shading the subject and improves safety when photographing subjects prone to a hostile disposition (wasps, for instance).
- A tripod that can support the camera close to the ground where many of your subjects will be. Note that if you are using a Nikon with the 105 mm macro lens you can often get by without a camera tripod because the lens is internally stabilized.
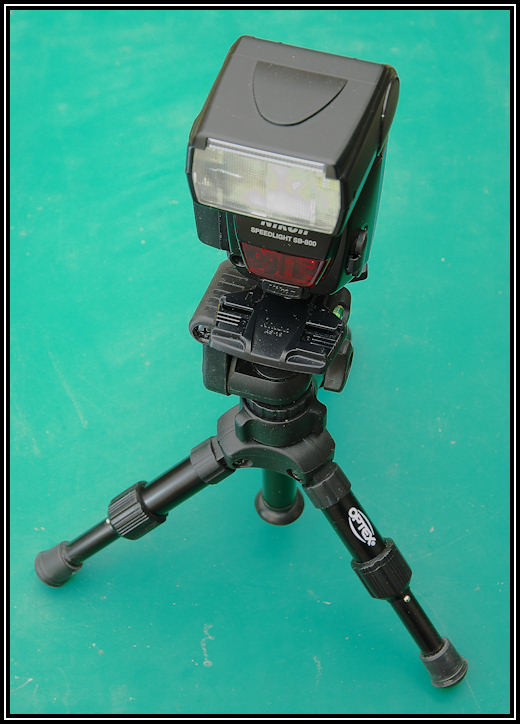
- An external flash unit - preferably two - and a small tripod to support it. Most camera departments have flimsy ultra-compact mini-tripods for around $15. These are perfect for flash units. Get one (or two) of the type that can be collapsed to support the flash just a few inches above the ground, table or floor.
Of course, you can make do with less - even just a snapshooter - and still get some great close-up shots but it will be more difficult and you will have more duds. Don't let lack of the "right" equipment discourage you from trying. Things are just easier if you have the appropriate gadgets. Some of the following recommendations for improving macro photos are applicable regardless of how you obtain your close-ups.
Challenges
Macro photography presents some serious challenges uniquely related to the low subject to image size ratio (high magnification). These are:
- Camera motion. The high magnification also magnifies the slightest camera jitter, easily ruining a photograph.
- Insufficient light. The camera and/or the photographer are very likely to shade the subject while the small apertures often used in an effort to improve depth of field require intense lighting if shutter speeds high enough to control camera shake are used.
- Very shallow depth of field. For any given lens aperture, depth of field is directly related to magnification. In macro photography depth of field is practically non-existent meaning that only a very shallow front-to-back section of the subject will be in sufficiently sharp focus to avoid looking fuzzy at presentation size. There are a number of ways to mitigate this problem but there is no total solution. Bear in mind that part of the appeal of a close-up image lies in an out-of-focus background causing the principle subject to stand out. Only with planar subjects covering the entire image frame would you ever want everything in sharp focus and - in such a case - DOF will usually not be a problem anyway. Generally, all we want is certain key elements of the image in sharp focus.
Technique
Controlling Camera Shake
If you are fortunate enough to be using the Nikon 105 mm VR (or the new Canon equivalent) this problem is largely solved. Some photographers say they don't like VR in a macro lens but I find it exceptionally effective. You can usually do without the tripod when using this remarkable lens. Many compacts and all super-zooms have stabilized lenses so, in this respect if none other, they have an advantage over most DSLR lenses. For example, it is possible to take excellent macro photos with the Panasonic FZ30 super-zoom.
If you don't have a stabilized lens, a small tripod for the camera is essential much of the time.
Getting Enough Light
Use flash. The best way is with an external unit at some distance to the side of your position along with the camera's built-in flash.
A further benefit of external flash, so long as you aim it directly at the subject and do not use a diffuser, is that it approximates a point source of light. This results in a very crisp delineation of outlines at the level of finest texture in the subject and greatly improves apparent sharpness over what you obtain with diffuse or natural lighting. Finally, the short duration of the flash lighting helps "freeze" the image, providing additional control over camera shake and subject motion. The importance of using flash in macro photography cannot be over-stated.
Maximizing Depth of Field (DOF)
DOF is inversely proportional to aperture (as determined by F-stop) and inversely proportional to magnification (ratio of image size to subject size). That is, as the F-stop number becomes smaller (meaning larger aperture) DOF decreases and as you get closer to the subject (magnification increasing), DOF also decreases. It doesn't matter how the magnification is obtained, whether in the camera or later when enlarging to presentation size.
- Stop down to improve DOF but at about F/11 to F/16 diffraction compromises sharpness so this is not a complete answer. Even at F/32, DOF will often be insufficient.
- Focus on what's important. With insects, as with most animate subjects, get the eyes sharp if nothing else. If the eyes are sharp the viewer tends to dismiss lack of resolution elsewhere in an image. With flowers, the stamens and interior detail of a blossom are similarly potent distractions from out of focus regions elsewhere. It isn't necessary - and is usually undesirable - for the entire image to be sharp.
- Consider more sophisticated methods (see next steps) in conjunction with the foregoing.
It is possible to increase DOF significantly and, with the second of the two methods below, even arbitrarily, although it could take a lot of work.
Note: In addition to Focus Magic, http://www.topazlabs.com now provides a focus correction plugin in both 32 and 64 bit versions for Photoshop and Paintshop Pro.
Use Focus Magic. This program is described in the Software section of this site. The method is as follows and can work only if you have FM installed as a plug-in for Photoshop, Paintshop or a similar compatible imaging product. That's because you must use some sort of selector tool to confine FM's processing to specific parts of the image.
-
Bring up the macro image in your imaging software.
-
Using the selector tool with free-hand option active, outline a critical out-of-focus area to be corrected. All parts of this area must be at very nearly the same camera to subject distance.
-
Launch the FM plug-in for focus correction. It will automatically identify the outlined area and present an estimate of how much it is out of focus. A sample of the corrected appearance will be displayed. You may want to reduce the amount of correction because FM tends to be overly ambitious concerning what can be done. In general, if the recommended correction is more than about "5" it will probably result in visible artifacts. Force this back to 5 or less and check the result although it is always worth a try to experiment with something more extreme. It may even be that the area selected is simply too far out of focus for FM to do more good than harm. Above all, you don't want distracting little fringes in your work giving away your secret. It is always better to be somewhat conservative with processing.
-
When the correction looks about right, Click OK and check results on the entire image. If the result isn't good there's always UNDO.
Iterate the previous 3 steps until you have corrected enough of the image that you obtain a satisfying improvement. Perfection is impossible and - unnecessary. Very often it is required only to correct one small area, such as a pattern on a butterfly's wing or the head of an insect. You cannot - and it would seldom be necessary - correct the entire image in this way. We are looking for an improvement only and, especially, an improvement in the most critical parts of the image likely to attract attention. Focus Magic works best where the amount of correction needed is fairly small but in situations where its use is appropriate, the effect can be dramatic. FM works equally well with both moving and static subjects. It also has a "Motion Blur" correction which can be used to reduce the effects of a small amount of camera shake or subject movement.
Note: The discussion of manual Focus Stacking which follows was prepared before the ready availability of software designed to automate the process. These products are expensive but work well. I use "Zerene" for which you can find out more by visiting http://www.zerenesystems.com. If you do a lot of macro work this product or one like it (if you choose something else) is well worth the expense. You will find there are limitations and pitfalls in use but with practice you'll get excellent results with very little effort.
Focus Stacking. This method goes far beyond what you can accomplish with Focus Magic but you have to plan ahead. It works only with stationary subjects and is a bit tedious but the results are worth it. With obsessive execution it could be used to achieve arbitrarily extended DOF but this is best left to the fanatic or someone having a very special need. Sample images follow the step-by-step instructions.
-
Set up your camera - preferably on a tripod because a fixed camera position is important - and focus on the nearest point on the subject you want to be sharp, then take a picture. IMPORTANT: Save the exposure settings (shutter speed and F-stop) by transferring to manual mode or engaging exposure lock, depending on how your camera works. All images taken in this set must be taken using the same settings. Let's call this image "NEAR".
-
Now focus somewhat farther away in the subject, just where DOF in the first image is visibly deteriorating. Best if you can do this without moving or re-aiming the camera. Nikon DSLRs have an option for changing the focus point without moving the camera and this is an ideal use for it. Take another picture, using exactly the same exposure settings as for NEAR, and call it "FAR".
-
You could keep repeating the previous step, going out slightly farther each time but often just one extra picture is sufficient to provide a dramatic result from the next steps ...
-
Process NEAR and FAR identically. We don't want any differences in exposure bias, contrast, color balance etc.
-
Bring both NEAR and FAR up in your imaging software.
-
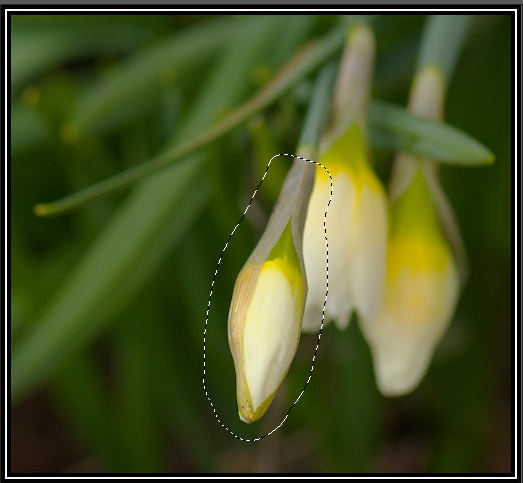
Use a copy of FAR as your base or background image. This will become your final, corrected image. On NEAR, use the free-hand selector tool in your imaging software to outline the entire area that looks sharp (probably in the center). Be sure to use several pixels of feathering so as to avoid producing visible boundaries in the final result. I haven't experimented yet but in some instances it might be possible to use "Magic Wand" to partially automate marking the area you want to select.
-
Copy the selected area to the clipboard.
-
Paste (as "New Selection" in Paintshop) to FAR (i.e., the copy of FAR) and slide this piece around until it exactly overlays the equivalent area in FAR. It's easy to be accurate to the pixel level.
-
You could be done but check the result to make sure you do not need to cut and paste any more sharp areas from NEAR (or the original FAR, in case your selection picked up some out-of-focus material in NEAR that overlays sharp imagery in the copy of FAR).
-
Save the new composite image under another name and process it further if you wish. You may notice some boundary areas need a bit of smoothing but I generally find them invisible. Just make sure what you did does not leave tell-tale tracks. The clone brush can prove invaluable.
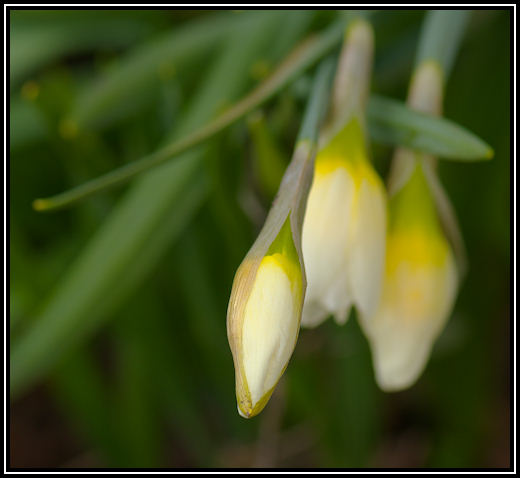
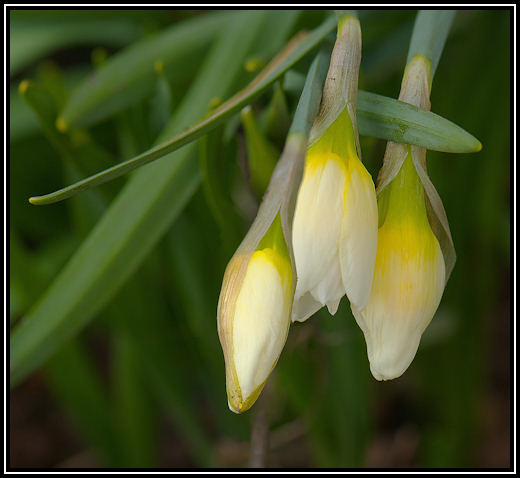
The images below were prepared to illustrate what has been described. This is not an attempt at making a good picture. Subject and camera position were simply chosen to provide an exaggerated DOF challenge. Both NEAR and FAR have very shallow DOF, ensured by using a large lens aperture and about 50% image to subject size ratio. (These are daffodils just starting to open up.) A camera tripod was not used which just goes to prove that with care you can get away with being lazy.
NOTE: The selection from NEAR included a fuzzy portion that partially overlaid part of the left-most blossom in the section of the composite coming from FAR. This was corrected by cutting and pasting a small overlay from the original FAR into the composite. That step isn't shown. Clearly, some iteration and fix-up is to be expected.
DOF in the result is sufficient to render sharply all the blossoms and some of the foliage. With more FAR images it would be possible to stretch DOF to include sharp imagery of the background foliage but that would only prove distracting and silly.
The entire process took about 5 minutes in Paintshop Pro. Obviously, this won't be necessary for all or even a majority of your macro shots but for those situations where you really do need extended DOF, it works.
There is software specifically designed to support focus stacking but I haven't tried it yet. You can also do focus stacking in Photoshop by combining layers but haven't tried that either.
Original NEAR and FAR images:
In NEAR (top image), the closest blossom is in focus (especially at the tip) but the two others are very fuzzy. In FAR (2nd image), it is the other way around. A single shot at this aperture cannot sharply render all the blossoms.
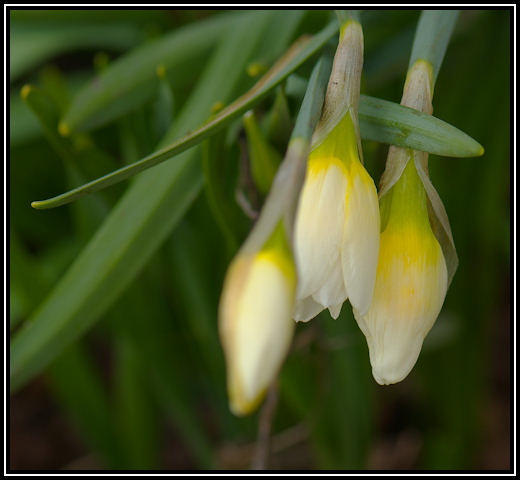
Composite of FAR with sharp selection pasted from NEAR - all blossoms are in reasonably sharp focus. By no means a perfect reconstruction but a nice improvement over either of the two original images.
Selection copied and pasted into FAR from NEAR
Miniature tripod - ideal for macro photography flash positioning. It even has a suction cup for attaching to a window but you might want to think twice before entrusting a $350 flash unit to such a gimmick.