Introduction
It is common to find postings in the photo forums complaining of difficulty in getting sharp telephoto images, even when using stabilized lenses. There is frequently the implication the lens may be defective or simply not very good in the first place. While very expensive "exotic" lenses such as the big Nikkors will have superior optical properties, many less costly telephotos can deliver excellent results with a bit of care.
This section is an attempt at addressing the issue, with the assumption the lens is not actually defective or of known mediocre quality. Defective products do make it to market, even from big name manufacturers, but this is quite rare. You can determine the expected quality of a lens by checking experienced reviewers such as Thom Hogan, dpreview, photozone, etc. Be aware that even with camera manufacturer lenses there is some unit to unit variation in acceptable performance. After-market brands are allegedly prone to a greater number and severity of sample variations so you might want to keep that in mind if purchasing such a unit.
For a discussion of this sort "telephoto" is something of a misnomer. The topic is really about "high magnification photography", a term appropriate to both telephoto and macro work. By "long telephoto" I mean anything over something like 200 mm, which is where most of the real challenges lie.
I suspect many - if not most - complaints about telephoto lenses arise from:
- Not understanding the limitations of telephoto photography.
- Not knowing all the methods available to obtain best results.
- A lack of appreciation for just how much more careful you must be at all stages of image acquisition and preparation. We have all been conditioned by the relatively relaxed technical requirements of conventional focal length photography. With long lenses, much more discipline is required.
The experts will, no doubt, be familiar with all the methods discussed but if you find just one thing that works and had not thought of it before, then the purpose of this article has been served.
At the bottom of this article you will find a few long telephoto shots taken using some of the methods recommended here.
Challenges
Long focal length means high magnification and that applies to everything:
- Image size
- Blur from subject movement
- Camera shake
- Depth of field (although inversely)
- Subject motion
Everything is amplified, including any carelessness in technique on your part. The only one of the above we want is increased image size.
Atmospherics: For telephoto shots of subjects at more than fairly close range (lets say 200 ft or so), interposing dust, heat waves, smoke (distant forest fires) and humidity (including ice crystals, fog) degrade image quality quickly in proportion to distance. Nothing can be done about this. Recognize the effect as something the lens cannot be held responsible for. Move closer to the subject or apply extra contrast in processing. Atmospheric effects almost invisible to the eye can readily soften photographic detail in telephoto shots. They are much less problematic during the morning hours, at high altitude and in cool weather.
Expectations
We use telephoto lenses because we want large images of distant subjects ... subjects that would be difficult or impossible to approach to obtain adequate image size using a short focal length lens. Owing to some of the challenges outlined above (atmospherics, especially, because magnification is a common factor), it is unreasonable to expect a telephoto shot to be as sharp as one taken with a shorter lens of the same subject at close range, assuming the lenses are of similar quality. Beyond 100 ft., unless conditions are excellent, there is bound to be something between lens and subject.
Responses
Depth of Field (DOF)
The first step is to understand how DOF works. For any subject range a lens is at optimum focus in only one plane, passing through the point of focus within the subject field. Behind and in front of this plane the image becomes progressively more blurred. For a certain portion of this fore and aft blurring the image is, however, acceptably sharp or imperceptibly blurred according to various technical criteria you can explore here.
DOF is dependent upon only two things (to simplify just a bit):
- Magnification (ratio of image size to subject size). As magnification increases, DOF decreases. You will often see subject range and focal length mentioned while magnification is not. It's all the same thing. I use "Magnification" as a simplifying concept because it combines all of subject distance, focal length and presentation enlargement.
- Focal ratio or "F stop" (ratio of focal length to aperture), As F stop increases (i.e., smaller aperture), DOF increases.
Contrary to some opinion, DOF has absolutely nothing to do with lens design.
Suppose we photograph a bird using a lens set at 500 mm FL using F/16 and then photograph that same bird at the same distance with another lens (or the same one) at 50 mm FL and F/16. We put both images up on our monitor and zoom the second one by a factor of 10 x so it is exactly the same size as the first one. You will observe the same DOF. Really. Of course, the image from the shorter focal length will almost certainly not be as sharp over-all because of degradation resulting from the extreme enlargement.
With a telephoto we are trying to get an image as large as possible so we don't have to zoom so much when editing, thereby losing quality. This is a technically sound objective. The problem is that the increased magnification shortens depth of field just as if you had walked closer to the subject in the first place and used a shorter focal length lens to get the same image size. There's no free lunch.
Conclusion: Many lens quality complaints arise because photographers are used to seeing low magnification images taken of a subject at a distance (landscape, for instance). These typically exhibit great DOF. It is then natural to expect that a distant subject much magnified by a tele and then some more in processing would also have good DOF.
Solution: There really isn't one except for the usual -
- Stop down if you need DOF - but beware diffraction.
- Pay special attention to focusing accuracy - more than with other lenses.
Monitors
It is difficult to assess the sharpness of an uncropped image fully displayed at less than 100% on a computer monitor. This may be the cause for some complaints about tele performance. Most monitors have a resolution of about 100 dpi which will just barely resolve 50 line pairs per inch. By any photographic standard this is poor to fair resolution. All images displayed on a monitor look somewhat coarse upon critical examination. Software must temporarily re-sample everything not displayed at 100% and JPEG compression may further compromise some detail. Of course, you can do meaningful analysis by zooming in to 100% and/or by cropping and zooming but that's not the way most images are normally viewed. At common presentation sizes, viewing distances and crop factors, the monitor is usually the limiting factor when it comes to detail.
The best way to make a determination of lens resolution (at least when "eye-balling" the result) is with glossy prints. Using ink jet technology these can resolve 150 - 200 line pairs per inch which is in the "excellent" range of presentation performance. This is also near the limit of resolution for the un-aided human eye. You can find out more about this by going to the "General Topics" menu and choosing the "Resolution" article (includes links to Hogan's and Koren's discussions as well).
Optimizing Resolution
In theory, a perfect lens is always sharpest at maximum aperture. You will actually find this performance with select camera lenses, such as the Nikkor 300 mm F/2.8. Most lenses are sharpest at 1 or 2 stops down from maximum with F/8 being a common "sweet spot". You may have to experiment with your own Tele but try to work at the aperture of maximum sharpness. Unfortunately, stopping down more may be required to obtain necessary DOF. This will reduce the inherent sharpness of the lens by enhancing diffraction effects. That is, the image will no longer be optimally sharp in the plane of focus. Finding the best trade-off is a function of your needs and experience.
Tripods
A really good tripod is still the best way to minimize camera shake. Unfortunately, a tripod that does more good than harm is remarkably expensive and heavy. Thom Hogan has a good section on the subject.
I find that a monopod does a better job than the typically somewhat jiggly tripod because it is, at least, solid in the vertical plane.
Putting a telephoto system on a tripod to examine performance may yield just as inconclusive a result as testing handheld. I have tried this using a good (but not excellent) tripod and discovered there is considerable induced tremor. You can sometimes improve matters by resting your hand on the camera or lens so as to dampen reactive forces when the shutter is released.
Hogan suggests you need to spend around $1000 to get a tripod and head that will provide meaningful control of a camera with a long, heavy lens. He's probably right. Years ago I built a tripod out of solid oak and heavy pine, all held together with screws and bolts. A broad platform accommodates a video fluid head. It is vibration-free beyond belief but so heavy that is is practical only for the back yard or when you can park your vehicle close to the photo site. For the handy-with-tools, a good option and the cost is pocket-change.
In this article we are mainly concerned with handheld telephoto work so enough about tripods, which are a nuisance at best.
Image Stabilization (IS (Canon), VR (Nikon), OS (Sigma), OIS (Panasonic) etc.)
Stabilization (hereafter referred to as "IS") may be the single most helpful photographic invention since the advent of electronically controlled cameras. Use it and understand it in the context of your specific equipment. I have the fine Sigma 150 - 500 mm telephoto. It has a remarkably effective stabilization mechanism BUT ... it is initially slow to engage. Once triggered by depressing the shutter release to the half-way point, the IS takes about 2 seconds to gain control. Contrast this with Nikon lenses which lock-in instantaneously. Other lenses may have similar peculiarities. Pay close attention to how yours works. You might be punching through to take that shot too soon. With care, I seldom have difficulty taking very sharp images with the Sigma even at 500 mm FL and 1/100 second but that 2 second delay is essential.
Obtaining Accurate Focus
Auto focus is a great feature but as subject range increases, accuracy diminishes. The problem is exacerbated if the subject moves back and forth (or if you sway slightly to and fro - we all do). Even a small amount of motion can throw the image out of focus during the instant before image capture. If the camera supports the features, experiment with continuous auto-focus and auto-tracking (singly and in combination). Learn how to use these. They really work. I have found many times that dynamic, predictive focusing in this way will improve the accuracy of shots, especially with animate subjects or when it is windy (causing foliage to move, for example). Take several shots close together in an attempt to capture the moment of optimal focus. There is always some lag in the mechanism and some automatically arrived at settings will be better than others.
Manual focus is sometimes recommended. From what I have read, automatic focusing is, on average, much more accurate.. This was a surprising conclusion until I began examining my legacy transparency collection from 35 mm film days. Upon close inspection it soon became apparent at least 30% of all images were somewhat out of focus although the camera focusing assists were properly aligned. Errors in automatically focused images in my digital collection occupy a much smaller range of deviation from optimum, confirming the report.
Most telephotos are rather slow (unless they are hugely expensive, like the exotic Nikkors and Canons). In low light this pushes auto-focus to the limits and you should expect more frequent small - but possibly noticeable - errors in focusing. Try to work in good light or, range permitting, avail yourself of an external flash unit's focusing assist lamp (SB-800/900 for example). Poor light may be one situation where manual focusing will sometimes give better results.
Use High Shutter Speed
IS notwithstanding, there still is no real substitute for using high shutter speed. This mitigates the effects of not only camera shake but subject motion as well (IS does nothing for subject motion). A rule of thumb is that shutter speed should numerically match focal length, at least. So, if you are shooting at 500 mm, use no less than 1/500 but if light permits, the more speed the better, especially with animate subjects. The problem is you may have to open the lens so much you lose required DOF or get into the lens "soft-zone" if it is not optimal at large apertures. You may need to use a higher ISO setting (let's say 800 or more) to provide additional aperture vs. shutter settings but that raises the spectre of noise. As usual, you are faced with trade-offs only you can manage.
At shutter speeds in excess of 1/500 you may get sharper images by disengaging stabilization. That's because the stabilization mechanism samples camera motion around 1000 times/second. At 1/500s you are pushing the Nyquist limit where stabilization may contribute to motion blur, rather than reducing it. Thom Hogan goes into this fully on his site.
Consider Flash
Flash is an underutilized photographic tool. I regularly use the Nikon SB-800 with long telephotos right out to a range of 200 ft. Even though the unit's range may be exceeded, the brief burst of light provides an overlay of the image frozen in time, as it were, and will improve apparent sharpness. At closer ranges, flash is unbeatable for controlling camera and subject motion while enhancing contrast.
Refine Your Holding Technique
The camera/lens combo will move around a lot less if you support the lens with one hand near the front element rather than grasping the handle. You can augment stability even further by leaning against something solid like a building, a vehicle, a tree or a rock. Thom Hogan disagrees but I finding holding your breath for a second while releasing the shutter is effective. Sitting or kneeling positions are more stable than standing upright.
Use Low ISO
This recommendation contradicts what might be necessary as suggested in "Use High Shutter Speed" above. There is no one size fits all solution to getting sharp telephoto images. So, if possible under the circumstances, use the lowest workable ISO. This is to discourage noise. Noise nibbles away at detail and even sophisticated attempts to remove it invariably result in further loss of detail. Yet again, you are stuck with what may be a difficult choice but there is no way out.
Optimize Noise processing
If you have good noise processing software (such as from Nik Software or in Paintshop Pro), pay attention to the options for selective noise removal - the color channels especially. You should have the ability to apply noise removal to any or all of the color channels plus luminance - individually or in any combination. Most cameras are noisier in one channel than the others. You will retain much more detail while dealing effectively with noise by applying processing to the channel that most needs it. Apply noise reduction to the luminance channel as a last resort because that's the one most important for rendering detail.
Unfortunately, in-camera processing applied to TIFFs or JPEGs does not offer a refined approach to noise or sharpening (hence the next advice).
Shoot RAW/NEF
This is no more inconvenient than shooting film (it is, in fact, a good deal more convenient) and provides maximum flexibility for dealing with noise and sharpening.
Sharpening
For best results, shoot RAW and process on your computer. Telephoto shots are critically sensitive to sharpening technique. Consider enhancement software such as "Focus Magic" which can correct minor focusing errors. It is available as a plug-in for Adobe and Adobe compatible imaging products. USM (UnSharp Mask) is a popular sharpening tool but is better at enhancing boundaries and contrasts than exposing fine detail. If available, try something like "high pass" filtering which I prefer for telephoto shots.
Anticipate the Best Moment for Release
As you examine your telephoto subject through the viewfinder you will probably notice that even with image stabilization active, the view wanders a bit. This is best seen by watching the focusing rectangle. The older you are the greater the amplitude and frequency of this annoying effect. Unless using a good tripod, you are stuck with this and it will certainly contribute some blur, especially at low shutter speeds. With some practice, you can almost eliminate this type of camera motion. Look closely and you will notice that it is repetitious. That is, it is characterized by periodicity or, more accurately, by your periodic instability.
Whenever the camera is about to reverse direction in this irritating dance, there is a very brief instant when it is essentially motionless. This is the time to release the shutter. If you wait until the exact moment of stability, however, you will miss the best release time so learn to anticipate when this will occur and commence release just a bit sooner. This works much better than you can imagine if you have never learned the technique. Your image stabilization system will thank you for the help ;-) With practice, the method will become second-nature and you won't even be conscious of the best time to release.
Substitute Focal Length
Many zoom lenses are at their worst at the longest focal length. "Worst" is a relative term so for purely photographic purposes (as opposed to "pixel peeping") this fall-off in performance might be a negligible or even unnoticeable issue. Nevertheless, some lenses are unequivocally soft at full extension but may be excellent elsewhere. There's a possibility you can work around this shortcoming if you think it is really compromising image quality in your case.
Find a stationary subject (here's where a brick wall can come in handy) and take some "best effort" shots at maximum focal length. We'll assume 500 mm. Use high shutter speed and a favorable F stop - let's say F/8.
At exactly the same F stop, photograph the same subject at a shorter focal length (but not too short). In this case, 450 mm or even 400 mm would be good choices.
Load an image from each focal length used, without processing. Use a scale of 100% for the shortest FL image. Now scale the image from the longer FL so it is exactly the same size. If you used 500 mm that would be 80% if the shorter FL was 400mm. Now decide which looks better (sharper, contrastier, better in the corners, etc.) You might find that even though it has been enlarged more, the shorter FL image has more desirable properties - sharpness especially. If so, you can try using that focal length as a substitute for the longer one in future and simply enlarge more in processing to make up the difference in image size.
This won't always be workable for a number of reasons but is worth a try, especially if the difference in FL between a soft image and a sharp one is small (20% or less). Be aware there is something of an "apples and oranges" effect at work. Images rendered at less than 100% on your monitor have been temporarily re-sampled by the computer display software whereas the 100% image is mapped one-for-one to the monitor pixels. This could put the longer FL image at an unfair disadvantage although I think it unlikely. Make your most critical comparison using glossy prints.
You could try this trick at other focal lengths and/or using various apertures to find the perfect combo for substitution although that sort of thing smacks of obsession.
Self-Timer and Mirror Lockup
These methods apply mainly to tripod telephoto work. Mirror lock-up will prove most effective at very low shutter speeds (less than about 1/30s) because the exposure is long enough to record the reactive motion and subsequent vibration as the mirror snaps up. Locking up the mirror first (not all DSLRs support this) eliminates that effect. It does, however, introduce another possible problem. With the mirror up, the camera must switch to contrast based auto-focus which is not as fast as the normal "phase detect" technology. Subject motion could now become more of a challenge.
Using the self-timer avoids having the camera jerk slightly as is very possible when using finger-powered shutter release. At the 2 second setting on the D300 (as an example), self-timed release is a usable option even in hand-held telephoto work although 2 seconds can be a long time when following a moving subject.
Take More Pictures
The critical nature of telephoto photography invariably means you will have more duds than at more usual focal lengths. Taking lots of spares helps ensure you will maximize the element of luck in your favor. That's not a very scientific recommendation but it is one that works. The camera's burst mode comes in handy for this.
Lens Hoods
Even if there is not a bright light source within the subject frame, any light from outside the field of view that strikes the lens will contribute some flare. This reduces contrast and leads to reduced image sharpness. Zoom lenses have hoods that provide inadequate shading at everything except their shortest focal length, so as to avoid cutting off part of the image at longer focal lengths. For critical work, try making your own adjustable hood from thin cardboard rolled and taped into a tube. It doesn't have to be fancy. You will see the difference, especially with contrasty subject material.
Summary and Demos
There are many options to consider when trying to maximize the sharpness of telephoto shots. Some of these apply to conventional photography as well. Not all suggestions will be useful in all situations nor to all photographers. You must develop a personalized repertoire of techniques in consideration of your specific equipment, shooting style and how you control the camera.
The most important thing to remember is that telephoto focal lengths magnify everything, including camera shake, subject motion and imperfect technique. Your margins for error and carelessness at all stages of image acquisition and preparation are greatly reduced in proportion to the focal length used. Image stabilization and auto-focus are fantastic aids but have clear limitations it is up to you to overcome.
This article concludes with a handheld telephoto demonstration:
These are not fine photographs in any way but merely images of subjects chosen to suggest what can be achieved technically with a bit of care and discipline.
These images have been prepared for optimum viewing on a 1920 X 1080 hi-def monitor operating at native resolution. If your monitor is set for anything less than about 1600 X 1200 the images will be visibly degraded.
You can also find handheld long focal length images in "The Birds" gallery and in "Tests and Sample Images".
All photos taken with Nikon D300 (ISO 200) and Sigma 150 - 500 mm. Focal length is 500 mm for all images with lens fully open at F/6.3. This should be the lens's least favorable operating point.
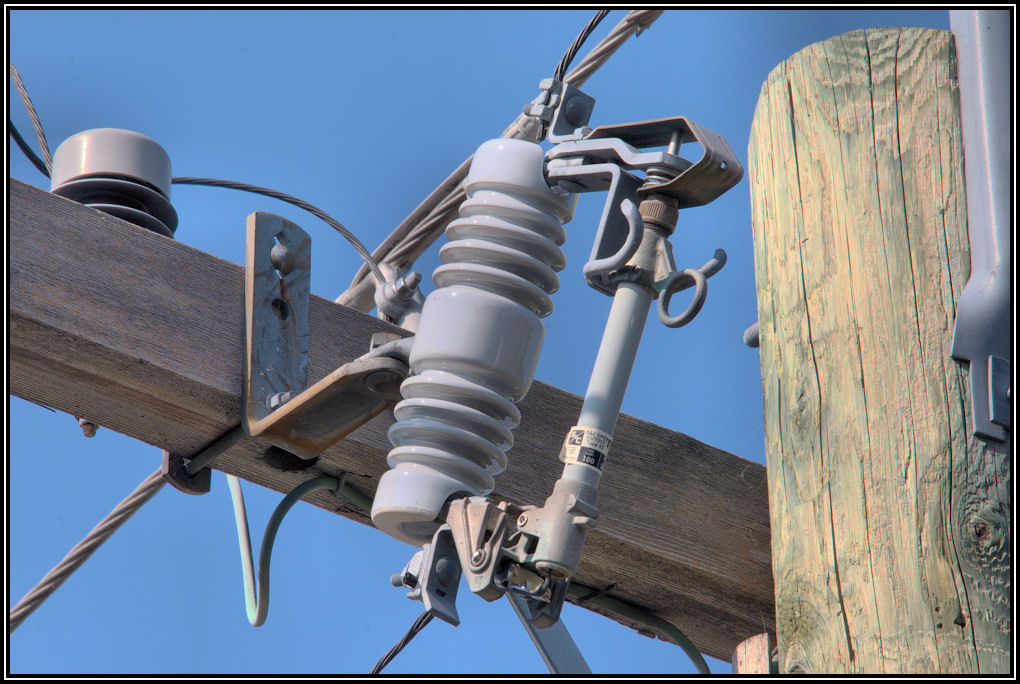
Electrical utility equipment: Uncropped. The subject range is about 110 ft. The original image is very sharp and would enlarge well to almost poster size as suggested by the cropped sections. Scaled for the monitor, there is considerable loss of detail, as proved by the crop following. Both the full image immediately below and the crop are taken from the same source image without any additional processing.
Close inspection reveals DOF effects with some parts of the image getting blurry for that reason (the bolt assembly right behind the insulator, for example). Focus was on the insulator itself. No noise reduction applied or needed. The image has the silky smoothness characteristic of low ISO shots.
This was the best of 3 shots using the "Anticipatory Release" method while standing. That's a good capture ratio for long shots taken at such a slow shutter speed under unstable conditions.
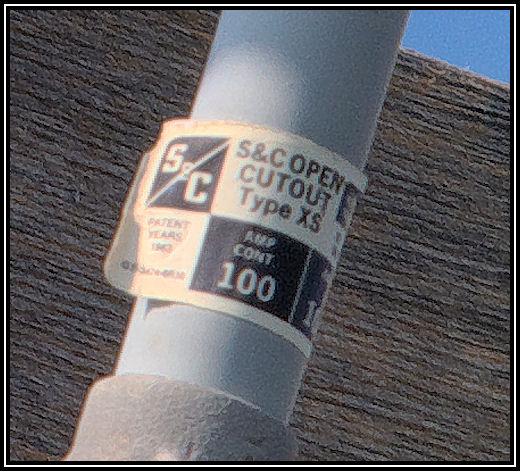
Crop from previous image (before re-sizing for monitor): There's a lot more detail visible now which demonstrates just how much degradation is attributable to the limited resolution of monitors. In the full image above much of the wood grain, bolt threads and detail in the bracket have been smoothed out by re-sampling and interpolation needed to fit the image to the page. No additional sharpening applied to the crop. Note fine structure in the wooden cross-arm and cobwebs on the steel bracket now clearly visible. There's no chromatic aberration despite this subject being of the sort to reveal it if it were there - a very commendable attribute of this lens. Note also an absence of sharpening halos. The original received a small amount of high-pass sharpening only. At this magnification the image would approach 30 inches on the long side.
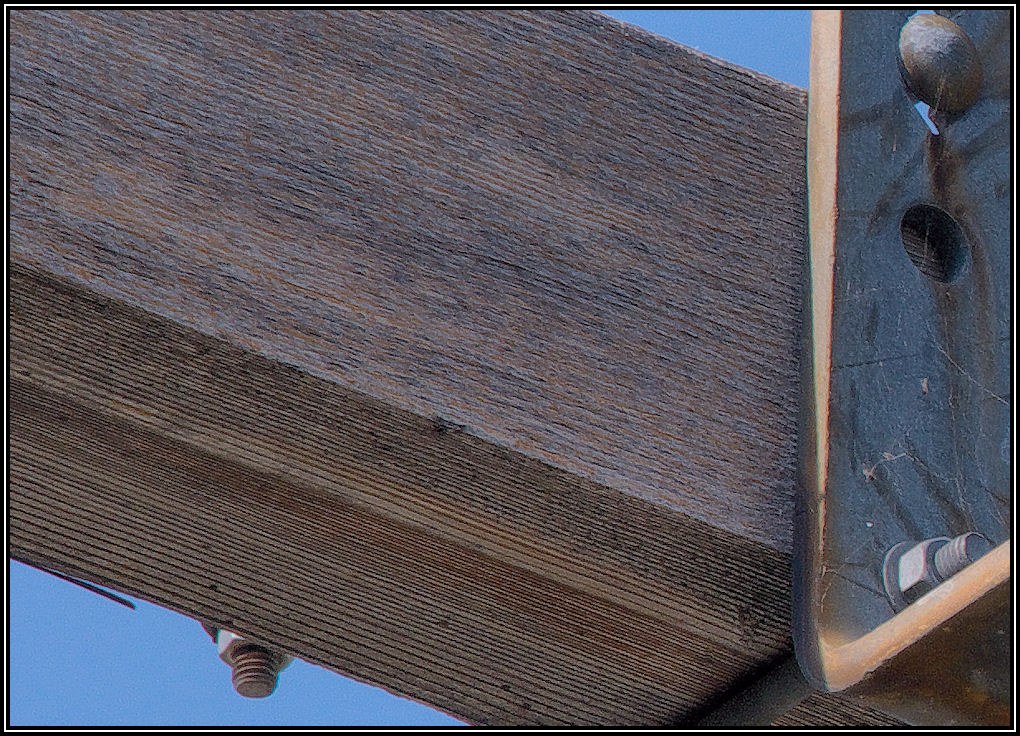
At this scale (greater than 1:1) we are seeing resolution limitations resulting from the camera sensor itself. Individual pixels are breaking up edges and outlines but the image is still holding up. Magnification is slightly greater than life-size so this is really pushing the limits for a long range shot.
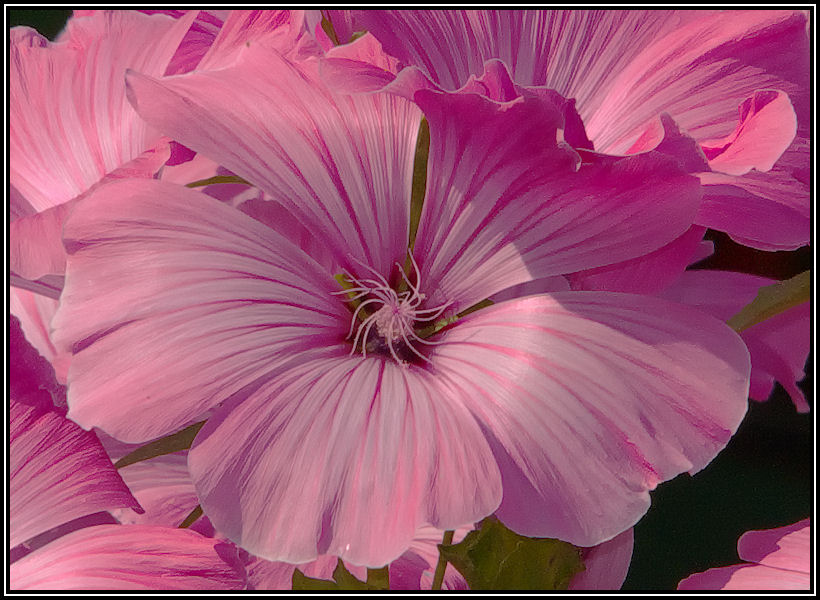
Lavateria: As seen here, image is over twice subject size and at about 80% zoom. Central crop.
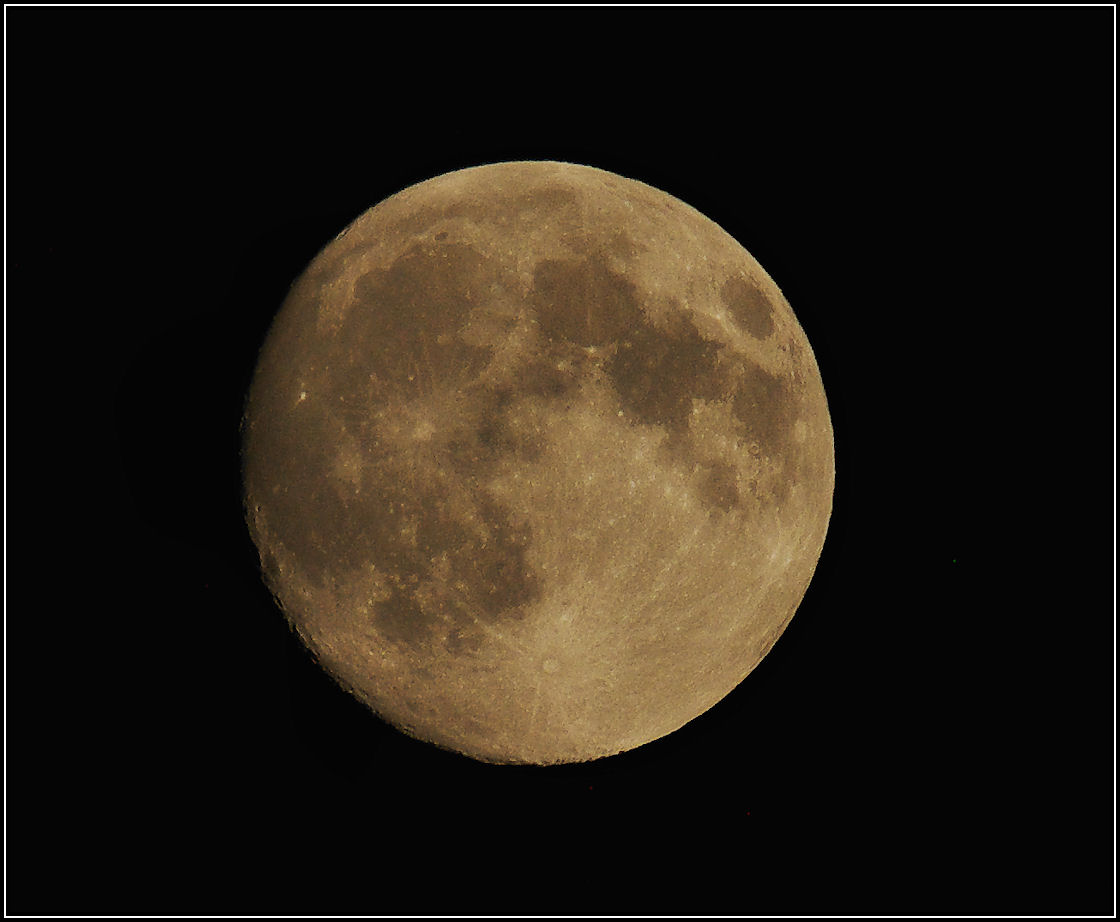
Moon: Very low on horizon and hazy. Note the coloration picked up from shooting through dusty evening air right over downtown Calgary. Handheld. Central crop.
Image zoom approximately 100%. At this zoom ratio the camera sensor's ability to render detail has been exhausted.
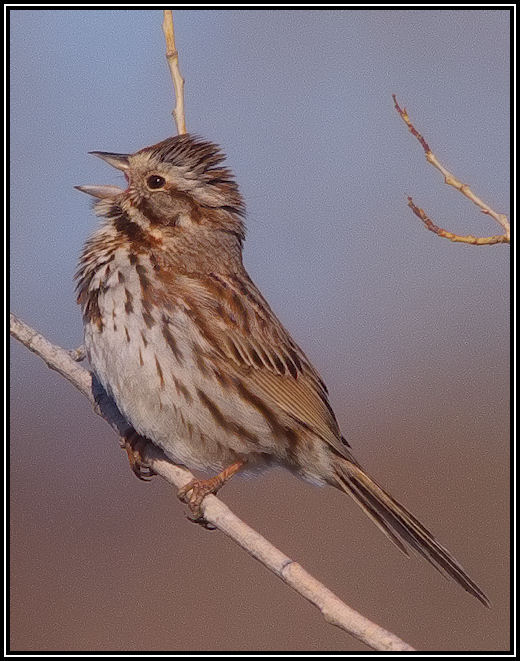
Song Sparrow: Subject rendered approximately 1.2 X life-size if you are viewing in native mode at 100 dpi. Windy with subject motion. Central crop. At this high magnification there's a small amount of noise apparent.